
Posts

Playing with Different Coloured Circles

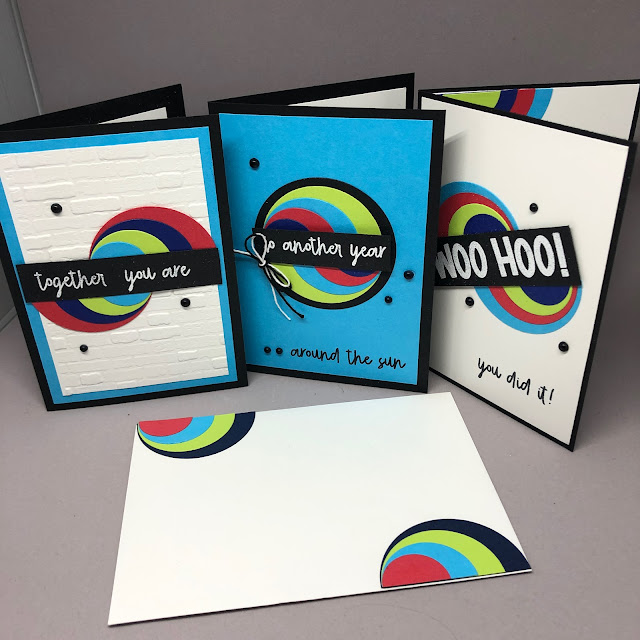
  I thought I would share with you another set of cards and technique that Learned recently on the Creative Card Retreat I attended. I am catching up with some of the presentations still and this tutorial came from one of the Creative team Jackie Bolhuis. These are the cards I made and the envelopes to match and you may just be able to see the inside decoration for the end card in the photograph! The cards look really striking in the new bright in-colours and you simply cut four circles in different graduating sizes using a circle punch - I used my layering circles dies. The you cut them in half on your trimmer. Then arrange. So this is how I layered up my half circles and then the photograph belo shows how I arranged them onto the card. Then simply add a sentiment to the card. The bright colours look great with black but what about trying pastels or a gradient of the same colour, or even glitter card - what about stitched circle dies? Lots and lots of variations and combinations with
Recent posts

Heat Embossing onto Vellum

I had a lot of fun this weekend at an online retreat with Brandy's Cards. One of the tutorials was heat embossing with white embossing powder onto vellum. I made three cards using the tutorial at the retreat but all of my cards are very different because the stamp sets are the ones I have and not the ones used by Brandy. So for example in the card above I stamped the butterfly stamp Butterfly Brilliance onto a piece of vellum using versa mark ink and then sprinkled on white embossing powder and heat it with my heat tool. The once dry I cut the image out using the co-ordinating dies from Stampin' Up and this gave me 6 butterflies which I then coloured on the back using blender pens. I found the darker colours worked the best and shone through the most. You don't see the back - so it is very forgiving technique if your colouring isn't very good! Following Brandy's lead I also decorated inside the card and made a matching envelope. I think its going to be a thing! Anot

Using the 'Let's Party Treat Packaging' Kit

 Hello there! What can you do if you have bought this wonderful party packaging kit for your party and you want to utilise the stamp set and some of the spare items such as the colourful pink and green dots and even the left over cut out pieces! What kit am I talking about ? Its the Lets Party Treat Packaging Kit - it costs only £18.00 and you can make 8 cute boxes using the contents. However, the major draw for me was the stamp set!! (pictured below'. In the stamp set you have sentiments, some cute images and a couple of little background textures. So a very handy little set! in addition the kit contains a Misty Moonlight ink spot, double sided tape and dimensionals and a stamping block. OF course it also includes all the paper/card bits and some bright sticky spots! I thought of lots of card ideas that I can use the stamp set for BUT what about adding some co-ordination to your party! So I used the leftover items , some watercoloring pencils and some additional white card to make

Hippest Hippos stamp set and Hippos Dies - Sale- A- Bration Freebies

  Yea! There is a new Winter catalogue out today and Sale-a-bration has begun and will be with you for the next two months. This means lots of lovely new things to try and lots of Freebies when you spend £45.00 or £90.00. There are no limits on how many Sale-a-bration Free gifts you can have subject to availability. This Hippo stamp set and dies have been very popular with Demonstrators like me who have been able to order everything a month early in order to prepare some samples for when the promotion begins. This Stamp set is Free when you spend £45.00. The dies are also free when you spend £45.00 The dies are adorable and apart from dies to cut out each of the 3 hippos in the stamp set there are additional dies (some with scored details) to dress up you Hippos! There is even a propeller for the little boat. (I wasn't sure what this one was to start with I thought it was a wonky flower!) I made 5 cards one in each of the new in-colours and I continued to use the In-colour card whe

Lots of fun with the Robot Buddies Kit

  Lots of ideas on how you can use your Robot Buddies kit today with a link to a You Tube video HERE. There's a tonne of stuff in this kit: TWO ink spots, Two sticker sheets, some wobbly eyes, two sheets of speech marks for your sentiments, 9 card bases, 9 envelopes and a stamp set with a block. Oh yes and some dimensionals. All you need is scissors to make the 9 cards in the kit and the instructions are also inside the box.  These are the images in the stamp set If you want to make some of the alternative cards, such as the one above, tags and mini album you may also want some blank note cards OR some whisper white card and a trimmer to cut it with. However, you can make a lot using just the kit! Here are the alternative cards I made. You can make backgrounds using the cogs stamps and also make use of lots of extra stickers and components that are in the kit. Here are some tags I made with the stamps and stickers. The album uses two cards and two envelopes plus another card for th